Introduction :
Android is everywhere
Phones Tablets. TVs and set-top boxes powered by Google TV. Soon, Android will
be in cars and all sort of other places as well. However, the general theme of
Android devices will be smaller screens and/or no hardware keyboard. And, by
the numbers, Android will probably be associated mostly with smart phones for
the foreseeable future. For developers, this has both benefits and drawbacks,
as described next.
Android powers hundreds
of millions of mobile devices in more than 190 countries around the world. It's
the largest installed base of any mobile platform and is growing fast. Every day
another million user’s power up their Android devices for the first time and
start looking for apps, games, and other digital content. Android gives you
everything you need to build best-in-class app experiences. It gives you a
single application model that lets you deploy your apps broadly to hundreds of
millions of users across a wide range of devices from phones to tablets and
beyond. As with increase in popularity of this platform it has become
attractive target for the hackers. Attackers have shifted their interest to
this platform because it not only gives access to victim’s files and personal
details but also gives information regarding victim’s location. Attackers can
intercept victim’s phone calls and messages.
Android malicious program also capable to detect if they are running in
emulator, this information can be very useful to malware author, lets see how, suppose
you are a malware author and you don’t want you malware to be detected by antivirus program, but it some
how catches suspicion of some malware analyst and out of curiosity he runs it
on emulator and he is all full of information which is radiated by your malware
program on network and all other sort of communication medium. Malware analyst
use sandboxes and analysis framework to detect malicious program infact even prior
publish your app on Google play store it Scan your app with Google Bouncer, It
is mainly based on Dynamic analysis which means it will observe behavior of you
app while it is running and this is done on an emulated environment. I haven’t
tried this code on Google Bouncer program. But what a smart malicious program will do is,
if they detect that they are running on emulator they will behave well manned
no stealing credentials, no logging keystrokes, etc i.e. they will behave like
a normal application what they look like non-malicious and escape this
detection program or the person trying to prove the app guilty. In this post will
show you how we can do this using API provide by android official SDK no low
level hack. Simple and straight.
Meet The C0d3s :
import
android.app.Activity;
import
android.content.Context;
import android.os.Bundle;
import
android.telephony.TelephonyManager;
import
android.widget.TextView;
import
android.widget.Toast;
public class MainActivity extends Activity {
@Override
protected void onCreate(Bundle
savedInstanceState) {
super.onCreate(savedInstanceState);
setContentView(R.layout.activity_main);
TelephonyManager tManager = TelephonyManager)getSystemService(Context.TELEPHONY_SERVICE);
String
uid = tManager.getDeviceId();
TextView
tv=(TextView) findViewById(R.id.code);
if(uid.compareTo("000000000000000")==0)
{Toast.makeText(this, "Runn!ng 0n
3mul4t0r", Toast.LENGTH_LONG).show();
tv.setText("Runn!ng 0n
3mul4t0r");
//Behave yourself (Run non-malicious
code stay calm)
}
else
{
Toast.makeText(this, "Runn!ng
0n "+uid, Toast.LENGTH_LONG).show();
tv.setText("Runn!ng 0n
Ph0n3");
//Run real malware program
}
}
}
What
is does ?
We
get the system “Telephoney Service “ which has information about your phone
like IMEI no(International Mobile Equipment Identity) this is exactly what we
need, Every cell phone on this earth is assigned a unique 14 digits to identify
them uniquely, Since on emulator there will be no such no if it return zero
will can say we are running on emulator or if we get real digits then hell yeah
! we are running on phone
Meet
The 0utput:

Running on Phone
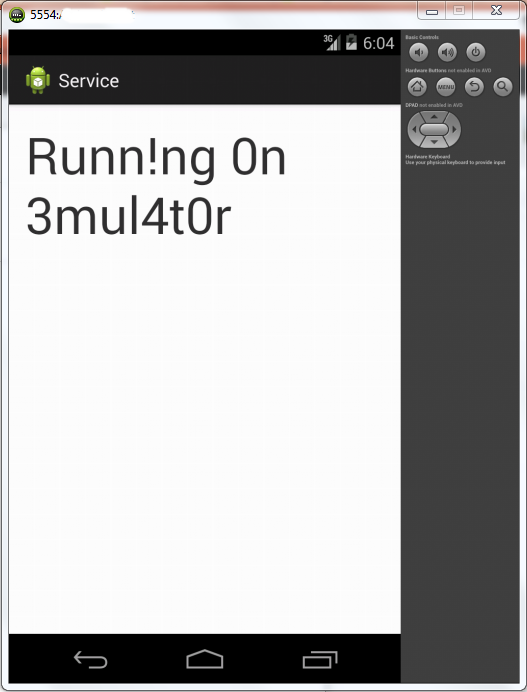
Running On Emulator